
Building and managing machine learning (ML) features at scale is one of the most critical and complex challenges in modern data science workflows. Organizations often struggle with fragmented feature pipelines, inconsistent data definitions, and redundant engineering efforts across teams. Without a centralized system for storing and reusing features, models risk being trained on outdated or mismatched data, leading to poor generalization, lower model accuracy and governance issues. Furthermore, enabling collaboration across data engineering, data science, and ML operations teams becomes difficult when each group maintains its own isolated datasets and transformations.
Amazon SageMaker addresses these challenges through SageMaker Unified Studio and SageMaker Catalog, which organizations can use to build, manage, and share assets securely across projects and accounts. A key capability within this ecosystem is the implementation of an offline feature store—a structured repository designed for managing historical feature data used in model training and validation. Offline feature stores are designed for scalability, lineage tracking, and reproducibility, so that data scientists can train models on accurate, time-aligned datasets that prevent data leakage and maintain consistency across experiments.
This blog post provides step-by-step guidance on implementing an offline feature store using SageMaker Catalog within a SageMaker Unified Studio domain. By adopting a publish-subscribe pattern, data producers can use this solution to publish curated, versioned feature tables—while data consumers can securely discover, subscribe to, and reuse them for model development. The approach integrates Amazon S3 Tables with Apache Iceberg for transactional consistency, AWS Lake Formation for fine-grained access control, and Amazon SageMaker Studio for visual and code-based data engineering.
Through this unified solution, teams can achieve consistent feature governance, accelerate ML experimentation, and reduce operational overhead. in this post, we show you how to design a collaborative, governed, and production-ready offline feature store to unlock enterprise-wide reuse of trusted ML features.
Solution overview
This solution demonstrates how to implement an offline feature store using a SageMaker Unified Studio domain integrated with SageMaker Catalog to enable scalable, governed, and collaborative feature management across ML teams. The architecture establishes a unified environment, shown in the following figure, that streamlines how administrators, data engineers, and data scientists create, publish, and consume high-quality, reusable feature tables.
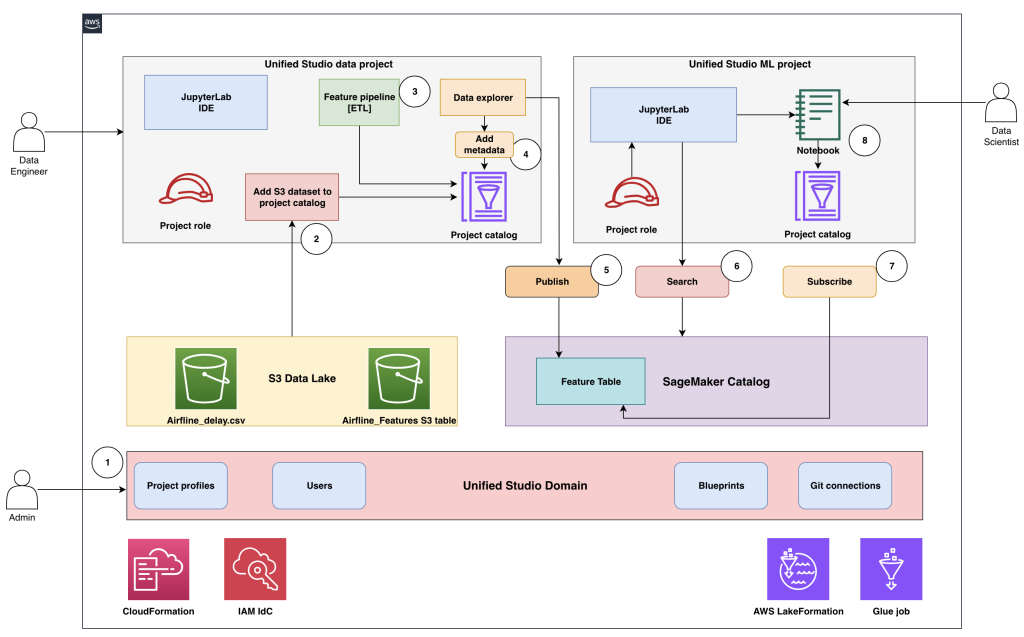
At its core, the solution uses a SageMaker Unified Studio domain as the governance and collaboration layer for managing projects, users, and data assets under centralized control. S3 Tables in the Apache Iceberg format serve as the foundation for storing and versioning feature data. SageMaker Catalog, which allows unified governance for datasets, acts as the central registry for publishing, discovering, and subscribing to feature tables.
The following describes how various personas interact in the end-to-end workflow:
- Admin uses AWS CloudFormation templates and the AWS Management Console to set up and configure the environment, including provisioning the SageMaker Unified Studio domain and onboarding users and groups.
- Admin creates the SageMaker Unified Studio data project and onboards Amazon Simple Storage Service (Amazon S3) datasets—such as
airline_delay.csvandairline_features(an S3 table)—to the project catalog, then designates the data engineer as the project owner. - Data engineer opens the data project, uses the Visual extract, transform, load (ETL) tool or a data processing job to build the feature pipeline, and creates features in the
airline_featurestable within the project catalog. - Data engineer accesses the data explorer tool to enrich the
airline_featurestable with metadata for improved discoverability and governance. - After validation and approval, the data engineer publishes the
airline_featurestable into SageMaker Catalog for organization-wide access. - Data scientist opens the ML project, uses AI powered search to find the
airlines_featurestable in the catalog, and identifies the published feature table as suitable for their model development. - Data scientist submits a subscription request to consume the published feature table. If auto-approval isn’t configured, the publisher must review and approve the access request.
- After approval, the data scientist gains access to the feature table through the project catalog, both through the data explorer and directly from Jupyter notebooks for model training and experimentation.
This structured workflow provides consistent data governance, promotes collaboration, and eliminates redundant feature engineering efforts by enabling enterprise-wide reuse of trusted, versioned ML features.
Core components
The offline feature store solution architecture is composed of several integrated components. Each component plays a distinct role in enabling secure data governance, scalable feature engineering, and seamless collaboration across ML personas. The key components include:
SageMaker Unified Studio domain: The SageMaker Unified Studio domain serves as the central control plane for managing ML projects, users, and data assets. It provides a unified interface for collaboration between data engineers, data scientists, and administrators. This domain enables enforcement of fine-grained access controls, integrates with AWS IAM Identity Center for single sign-on, and supports approval workflows to help ensure secure sharing of ML assets across teams and accounts.
S3 Tables with Apache Iceberg format: S3 Tables enables scalable, serverless storage for feature data using the Apache Iceberg table format. Apache Iceberg Open Table Format (OTF) enables ACID transactions, schema evolution, and time-travel capabilities, which teams can then take advantage of to query historical versions of feature data with full reproducibility. S3 Tables seamlessly integrate with Spark, Glue, and SageMaker for consistent data access across analytical and ML workloads.
Feature engineering pipeline: The feature engineering pipeline automates the transformation of raw datasets into curated, high-quality features. Built on Apache Spark, it provides distributed data processing at scale, enabling complex transformations such as delay-rate computation, categorical encoding, and feature aggregation. The pipeline directly writes outputs to S3 tables, helping to ensure traceability and consistency between raw/processed data and engineered features.
SageMaker Catalog: SageMaker Catalog acts as the organization-wide repository for registering, publishing, and discovering ML assets such as datasets, feature tables, and models. It integrates with Lake Formation for fine-grained access control and IAM Identity Center for user management. The catalog supports metadata enrichment, versioning, and approval workflows, so teams can securely share and reuse trusted assets across projects.
Together, these components create a cohesive ecosystem that simplifies ML feature lifecycle management—from creation and publication to discovery and consumption—while maintaining enterprise-grade governance and data lineage tracking.
Administrator workflow
The administrator workflow defines the initial setup required to establish a secure and collaborative environment for implementing the offline feature store. Administrators provision the SageMaker Unified Studio domain, enable IAM Identity Center for user authentication, and configure S3 tables with Lake Formation for governed data access. They also create dedicated producer and consumer projects, deploy the necessary infrastructure through environment blueprints (based on CloudFormation), and assign users and groups with appropriate permissions. This setup helps ensure a consistent, well-governed foundation that data engineers and data scientists can use to build, publish, and consume ML features seamlessly within SageMaker Unified Studio.
Prerequisites
The following prerequisites must be completed to help ensure that the required AWS services and permissions are properly set up for seamless integration and governance.
- Enable IAM Identity Center
- Navigate to IAM Identity Center in the console.
- Choose Enable if not already activated.
- Choose Enable with AWS Organizations or standalone and complete the setup wizard.
- Enable S3 Tables
- Go to Amazon S3 in the console.
- Select the S3 Tables section and choose Enable S3 Tables integration.
- Lake Formation administrator
- Verify that the console role is added to Lake Formation administrators for proper resource creation and permissions management.
Set up the environment
After completing the prerequisites, the next step is to set up the environment by creating and configuring the SageMaker Unified Studio domain, which serves as the central workspace for managing users, projects, and data assets within the offline feature store architecture.
Set up a SageMaker Unified Studio domain:
- Navigate to the SageMaker Unified Studio console and choose Domains in the navigation pane. Choose Create domain and then choose Quick Setup.
- Choose to create a new VPC or select an existing VPC for the domain network configuration.
- Expand Quick setup settings and enter a domain name (for example,
Corporate). - For Domain Execution role and Domain Service role, select Create and use a new service role.
- Select a VPC (VPCs tagged with
SageMaker Unified Studioshould be correctly configured) and choose at least three private subnets, each in a different Availability Zone. - Choose Continue to proceed with domain creation.
- Create an IAM Identity Center user account by providing an email address, first name, and last name (you will receive an email to activate your IAM Identity Center account after creation).
- Choose Create domain to start the domain creation process. Domain creation typically takes 2–5 minutes to complete.
Create a SageMaker Unified Studio project:
- Go to the SageMaker Unified Studio domain URL and sign in using the IAM Identity Center credentials created during domain setup and accept the invitation email if received.
- Create projects:
- Go to Select Project and choose Create project from the domain homepage to create a producer project and name it
airlines_core_features. Add descriptions, configure settings, and assign users and permissions. - For Project profile, select All Capabilities.
- Repeat the two preceding steps to create a consumer project names
airlines_ml_models.
Note :- Project creation typically takes 5–10 minutes to complete.
- Go to Select Project and choose Create project from the domain homepage to create a producer project and name it
- Copy the project role ARN
- Navigate to
airlines_core_featuresproject details. - Navigate to the project and copy the project role Amazon Resource Name (ARN) (
arn:aws:iam::ACCOUNT:role/datazone_usr_role_*) - Repeat the preceding two steps for
airlines_ml_models
- Navigate to
Infrastructure deployment
Deploy the CloudFormation stack only after completing the previous steps, including domain creation, project creation, IAM Identity Center setup, and S3 Tables enablement. The stack requires the following input parameters:
- IAM Identity Center ID: Navigate to the IAM Identity console to retrieve the first part of the AWS access portal URL. It will look like
https://d-1234da5678.awsapps.com/start - SMUSProducerProjectRoleName: Navigate to the Unified Studio project portal, open your producer project, and retrieve the project role name. For example,
arn:aws:iam::<account-id>:role/datazone_usr_role_xxxx_yyyy - SMUSConsumerProjectRoleName: Repeat the preceding step to retrieve consumer project role name.
![]()
After the stack deploys successfully, the following AWS resources will be created:
- S3 bucket: For raw and curated data storage, such as
amzn-s3-demo-blog-smus-featurestore-{account-id} - S3 table bucket: For Iceberg table storage, such as
amzn-s3-demo-airlines-s3tables-bucket - S3 table namespace: Organized feature table namespace, such as
airlines - S3 table: for feature storage, such as
fg_airline_features - Glue Database: for source data catalog, such as
airline_raw_db - IAM Identity Center groups: Producer and consumer groups, such as
FeatureStore-Producers, FeatureStore-Consumers - Lake Formation permissions: Fine-grained access control, such as
databaseandtable permissions - IAM roles and policies: For service integrations, such as – SageMaker execution roles.
Add SSO groups to the SageMaker domain
Assign IAM Identity Center groups for single sign on (SSO) to the SageMaker domain to enable user access and collaboration across projects.
- Navigate to the SageMaker Unified Studio console and choose domain from the navigation pane.
- Goto User management.
- Choose Add users and groups to manage domain access.
- Select SSO Groups.
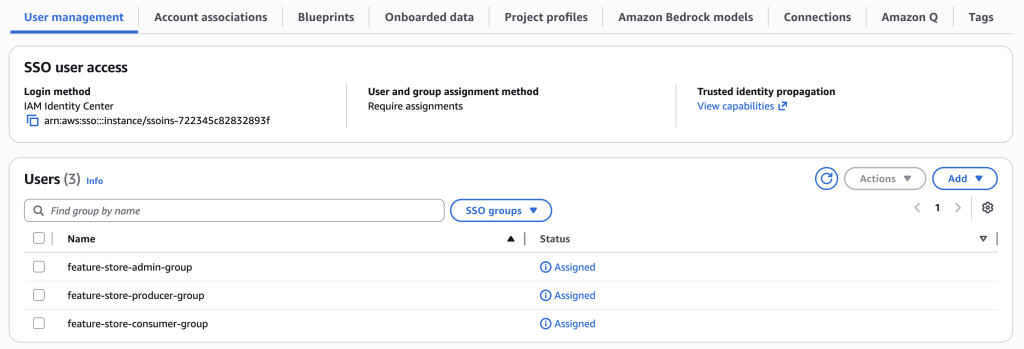
- Choose the SSO groups that were created during infrastructure deployment:
feature-store-admin-group(for admin)feature-store-producer-group(for data engineering teams)feature-store-consumer-group(for data science teams)
- Choose Add to complete the assignment and enable group access
- The User Management section will show the SSO groups as Assigned.
Create IAM Identity Center users
Create individual users for data producers, consumers, and administrators to access the SageMaker domain.
Create the data producer user:
- Navigate to the IAM Identity Center console and choose Users from the navigation pane.
- Choose Add user enter the user details:
- Username: Enter
dataproducer. - Email: Enter a valid address, such as
dataproducer@example.com. - First name: Enter
Data. - Last name: Enter
Producer. - Assign the user to
feature-store-producer-group.
- Username: Enter
- Send an invitation email for account activation.
Create the data consumer and admin users:
Use the same steps to create the data consumer and admin users, with the following differences for step 2:
- Create the data consumer user:
- Username: Enter
dataconsumer. - Email: Enter a valid address, such as
dataconsumer@example.com. - First name: Enter
Data. - Last name: Enter
Consumer. - Assign the user to f
eature-store-consumer-group.
- Username: Enter
- Create the admin user:
- Username: Enter
dataadmin. - Email: Enter a valid address, such as
dataadmin@example.com. - First name: Enter
Data. - Last name: Enter
Admin. - Assign the user to
feature-store-admin-group.
- Username: Enter
Add user groups to projects
Sign in to the SageMaker Unified Studio corporate domain as the admin user from UI Console and assign the user groups to their corresponding projects for proper access control.
Assign users to the Producer project:
- Navigate to
airlines_core_featuresproject settings. - Go to the Members section.
- Add
feature-store-producer-groupwith appropriate project permissions.
Assign users to Consumer project:
- Navigate to airlines_ml_models project settings.
- Go to the Members section
- Add
feature-store-consumer-groupwith appropriate project permissions.
Upload a dataset to an S3 Bucket
Create the S3 prefix /raw/AirlineDelayCause/ in the S3 bucket amzn-s3-demo-blog-smus-featurestore-<account-id> created by the CloudFormation template. Use the Amazon S3 console to upload the sample airline delay dataset to the S3 bucket prefix s3://amzn-s3-demo-blog-smus-featurestore-<account-id>/raw/AirlineDelayCause/
Verify data access
After uploading the dataset, navigate to the airlines_core_features project and query the data using AWS Data Catalog:
SELECT * FROM "awsdatacatalog"."curated_db"."airline_delay_cause" LIMIT 10;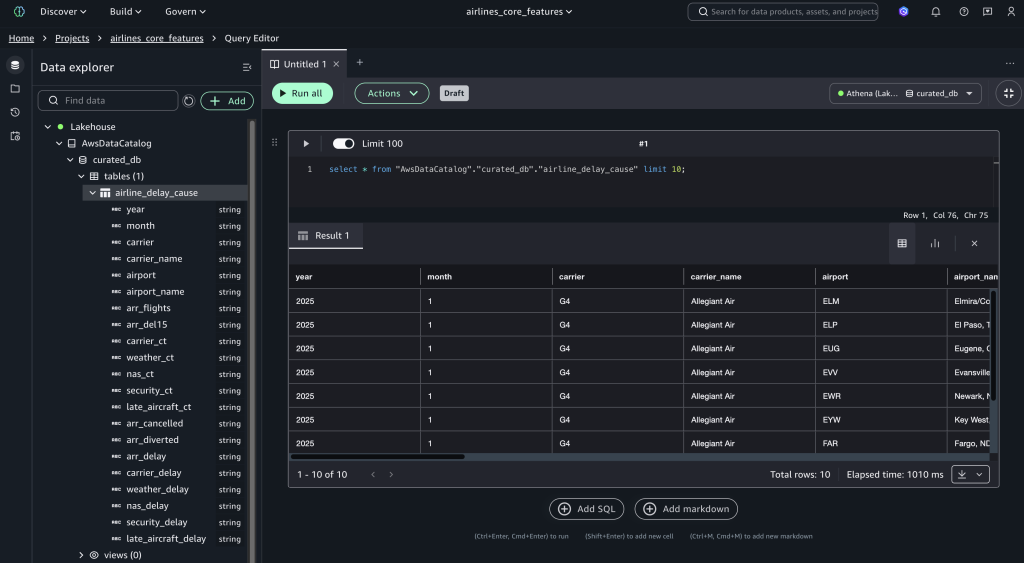
Verify the feature store table
Query the feature store table to verify that its accessible. It will return zero records but should execute without errors.
SELECT * FROM "s3tablescatalog/airline"."airline"."fg_airline_features" LIMIT 10;
Data engineer workflow
This workflow demonstrates how data engineers create and share features using SageMaker Unified Studio and S3 Tables.
Sign in as the data producer user
Navigate to the SageMaker Unified Studio domain and sign in using IAM Identity Center credentials as the dataproducer user (member of the feature-store-producer-group), then access the airlines_core_features project.
Create a feature engineering job
- Download the airlines-delay-cause-feature-engineering-pipeline script to your local system.
- Navigate to Build Tools and select Data processing Jobs.
- Select the airlines_core_features project, then choose Continue.
- Go to the Code-based job section and choose Create job from file.
- Choose file and select Upload your local file. Select the File and choose Next.
- Enter
airlines-delay-cause-feature-engineering-pipelineas the job name and choose Submit. - Select the created job and choose Run Job to run the pipeline.
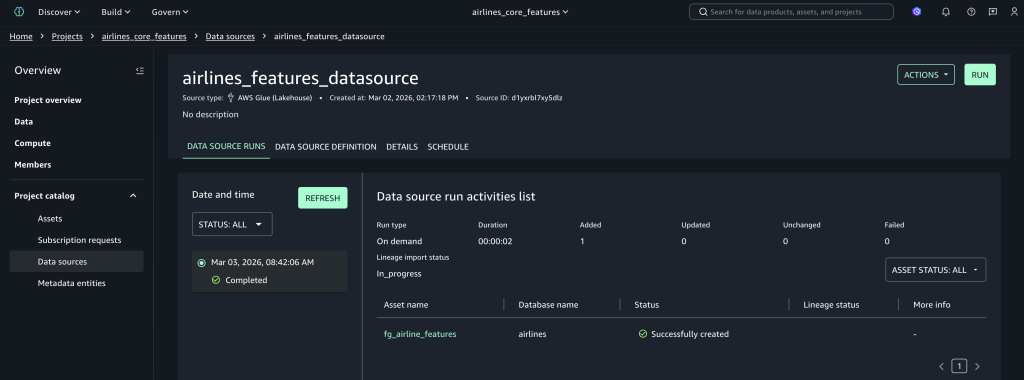
Create the data source connection
- Navigate to the Data sources.
- Choose Create data source.
- For Data source Name, enter
airlines_features_datasource. - For Data source type, select AWS Glue Data Catalog.
- Go to Data Selection and enter the catalog name as
s3tablescatalog/airlines. - For the database name, select airlines from the dropdown list.
- Set Table selection criteria as
*and choose Next. - In Publish assets to the Catalog, select No, and choose Next.
- Set Run preference to On Demand and choose Next.
- Choose Create to create the data source and discover tables.
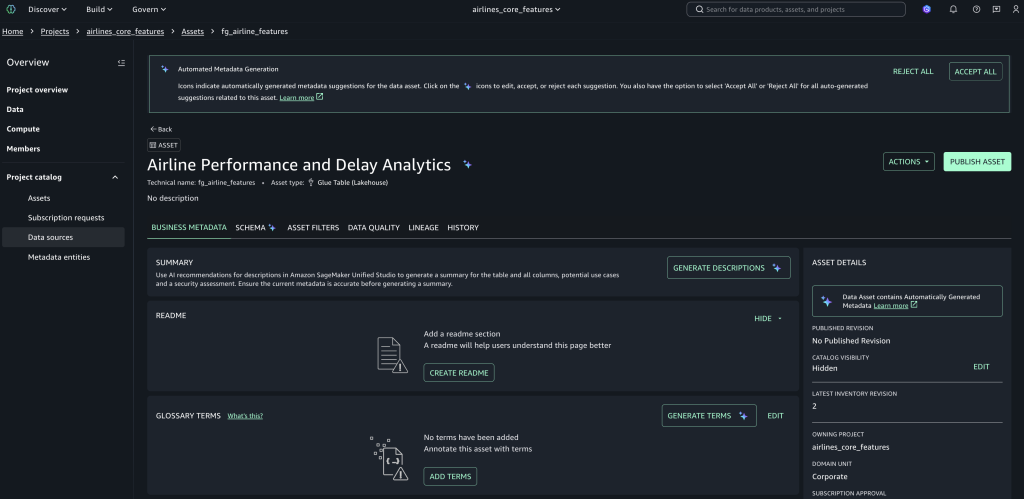
Publish feature assets
- Go to Assets and select the
fg_airline_featuresasset, which was created by the data source job. - Choose Publish asset, add metadata and descriptions, and complete publishing to make it discoverable across projects.
Verify the feature store
Query the created feature store loaded by the data processing job.
- Open the query editor from the Build Tools pulldown.
- Set the connection to s3tables catalog, and run the following query:
SELECT * FROM "s3tablescatalog/airlines"."airlines"."fg_airline_features" LIMIT 10;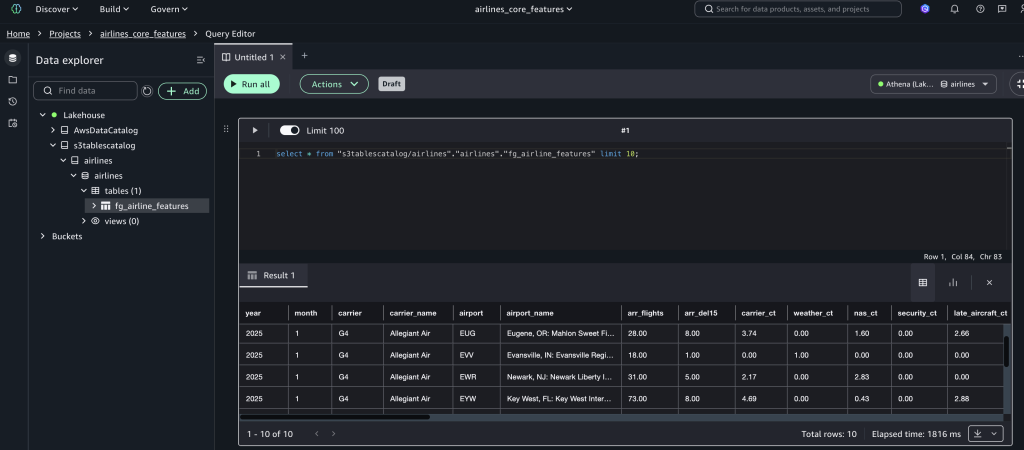
Now the feature store table will be discoverable by other projects.
Data scientist workflow
This section demonstrates the end-to-end machine learning workflow for data scientists consuming features from the offline feature store built with S3 Tables and SageMaker Unified Studio, starting with the dataconsumer user sign in.
Sign in as the data consumer user
Navigate to your SageMaker Unified Studio domain URL, sign in using the data consumer credentials and select the consumer project airlines_ml_models.
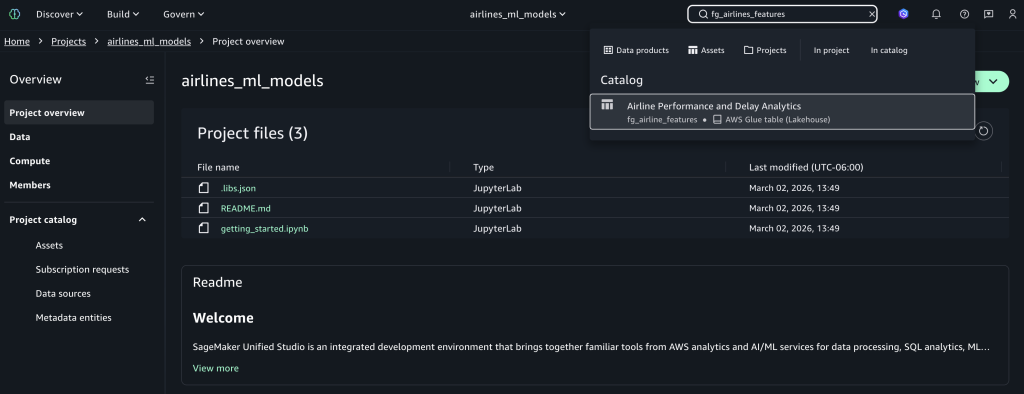
Search for features
Use the search bar and enter fg_airlines_features as the feature store name to find the published asset, then select the fg_airlines_features catalog asset. You can also use the AI-powered catalog search to find features using the partial name of features and their description.
Subscribe to assets
Choose Subscribe for the selected airline feature asset, enter a business justification for ML model development, and submit the access request for approval.
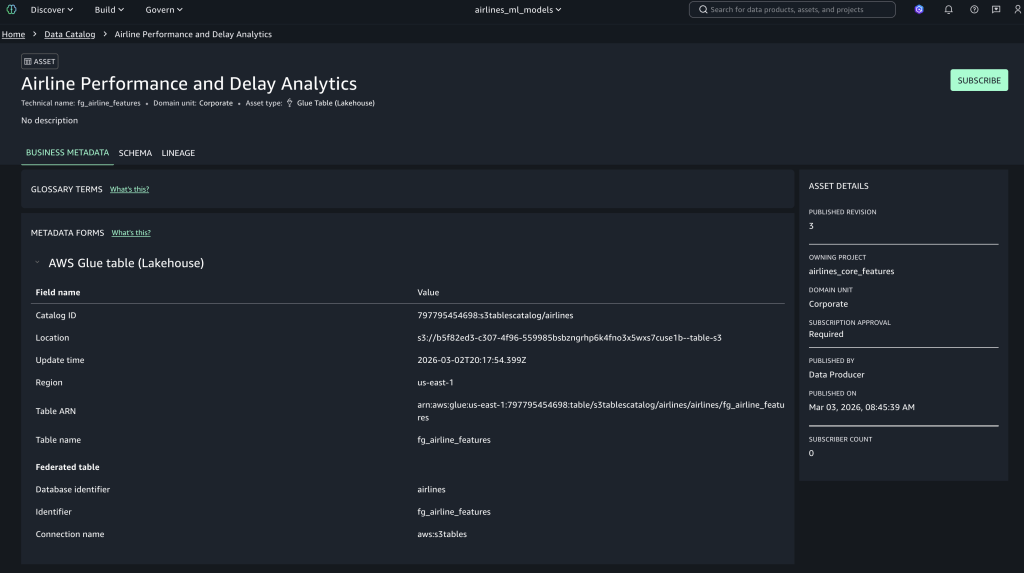
Access approved assets
The data producer user can view the pending subscription requests in their workflow. When the subscription is approved by a data producer, the fg_airline_featurestore table will be visible in the project catalog database and available to query, as shown in the following figure.
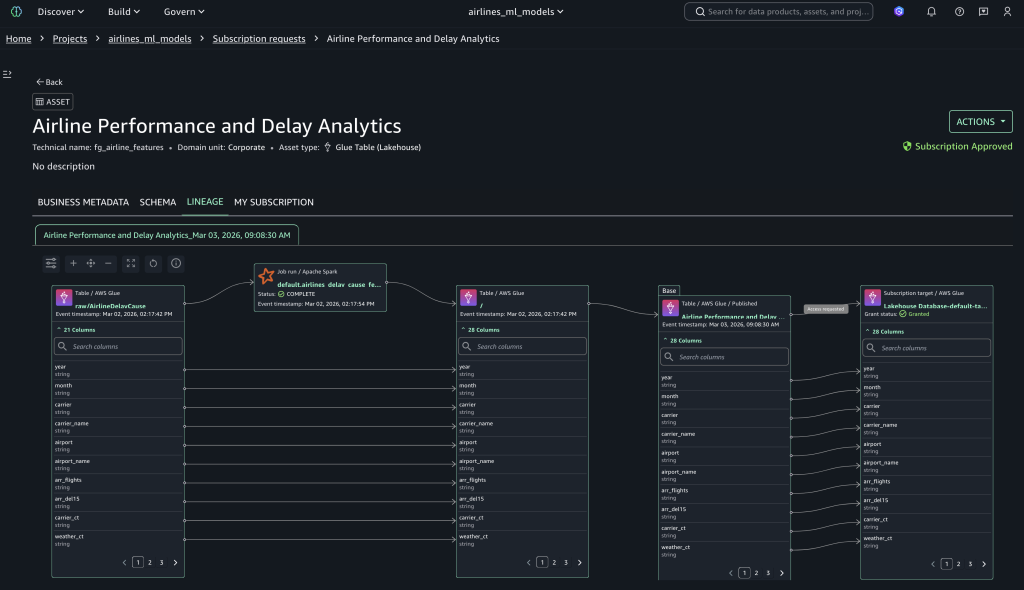
Data lineage tracking
Data lineage in SageMaker Catalog is an OpenLineage-compatible feature that you can use to capture and visualize lineage events—from OpenLineage-enabled systems or through APIs—to trace data origins, track transformations, and view cross-organizational data consumption. To view data lineage, select the Lineage tab to display the complete lineage of your subscribed assets, as shown in the following figure.
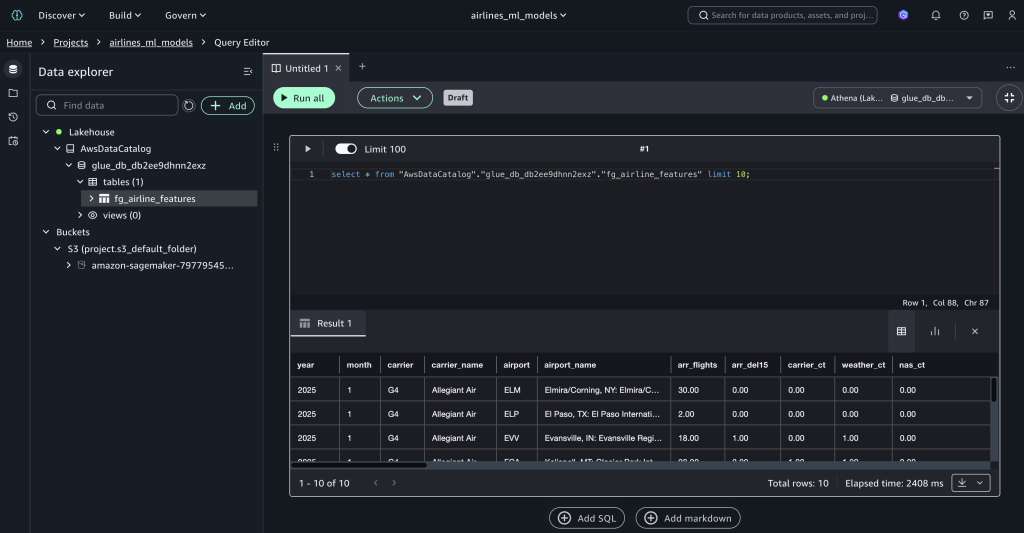
Query the feature store with time-travel capabilities
After you have access to the published feature store, you can use the following queries in SQL Query Editor to query the data and use Iceberg’s time travel capabilities.
Query the feature store:
SELECT * FROM "fg_airline_features" LIMIT 10;
Retrieves the latest 10 records from the feature store.
View available versions:
SELECT snapshot_id, committed_at, operation, summary FROM "fg_airline_features$snapshots" ORDER BY committed_at DESC;Lists all historical snapshots with timestamps and operations, showing how the feature table evolved.
Time travel queries
-- Query specific version
SELECT * FROM "fg_airline_features"  FOR VERSION AS OF <snapshot_id_here> LIMIT 10;
Retrieves features from a specific snapshot version, ensuring reproducibility for model training.
-- List Available Timestamps:
SELECT committed_at  FROM "fg_airline_features$snapshots" ORDER BY committed_at DESC;
Lists all timestamps when the feature table was modified.
-- Query as of timestamp
SELECT * FROM "fg_airline_features"
FOR TIMESTAMP AS OF TIMESTAMP <time_stamp> LIMIT 10;
Retrieves features as they existed at a specific time.
View table history
SELECT * FROM "fg_airline_features$history"
ORDER BY made_current_at DESC;
Displays the complete audit trail with snapshot IDs and timestamps for compliance and debugging.
This consumer flow enables efficient feature reuse across teams while maintaining proper governance and access controls.
Use an S3 table as an offline feature store
In this section, you learn how to set up an S3 table to use as an offline feature store for training and batch inference.
- Download the sample training-batch-inference notebook, which demonstrates how to use an S3 table as an offline feature store for model training and batch inference.
- Go to the consumer project airlines_ml_models.
- Go to Build Tools and select Jupyter Notebook, then upload the downloaded notebook. Configure the following parameters in the notebook based on your project:
- Bucket Enter
<amzn-s3-demo-bucket-name>. For example,sagemaker_project_bucket - Region: Enter
<your-aws-region>. For example,us-east-1 - s3_path: Enter
s3://< amzn-s3-demo-bucket-name >/<your-project-path>/dev/ - database: Enter=
<your_glue_database_name>. For example,project_glue_database - table_name: Enter
<your_feature_group_table>. For example,project_feature_group_table
- Bucket Enter
This notebook implements training and batch inference pipeline for airline delay prediction using the Amazon SageMaker XGBoost regression algorithm. The pipeline executes the following steps:
- setup_mlflow: This function sets up the MLflow experiment using an existing SageMaker MLflow server for your project.
- load_data_from_athena: This function use an Athena connection to load features from the S3 table into test and train data frames.
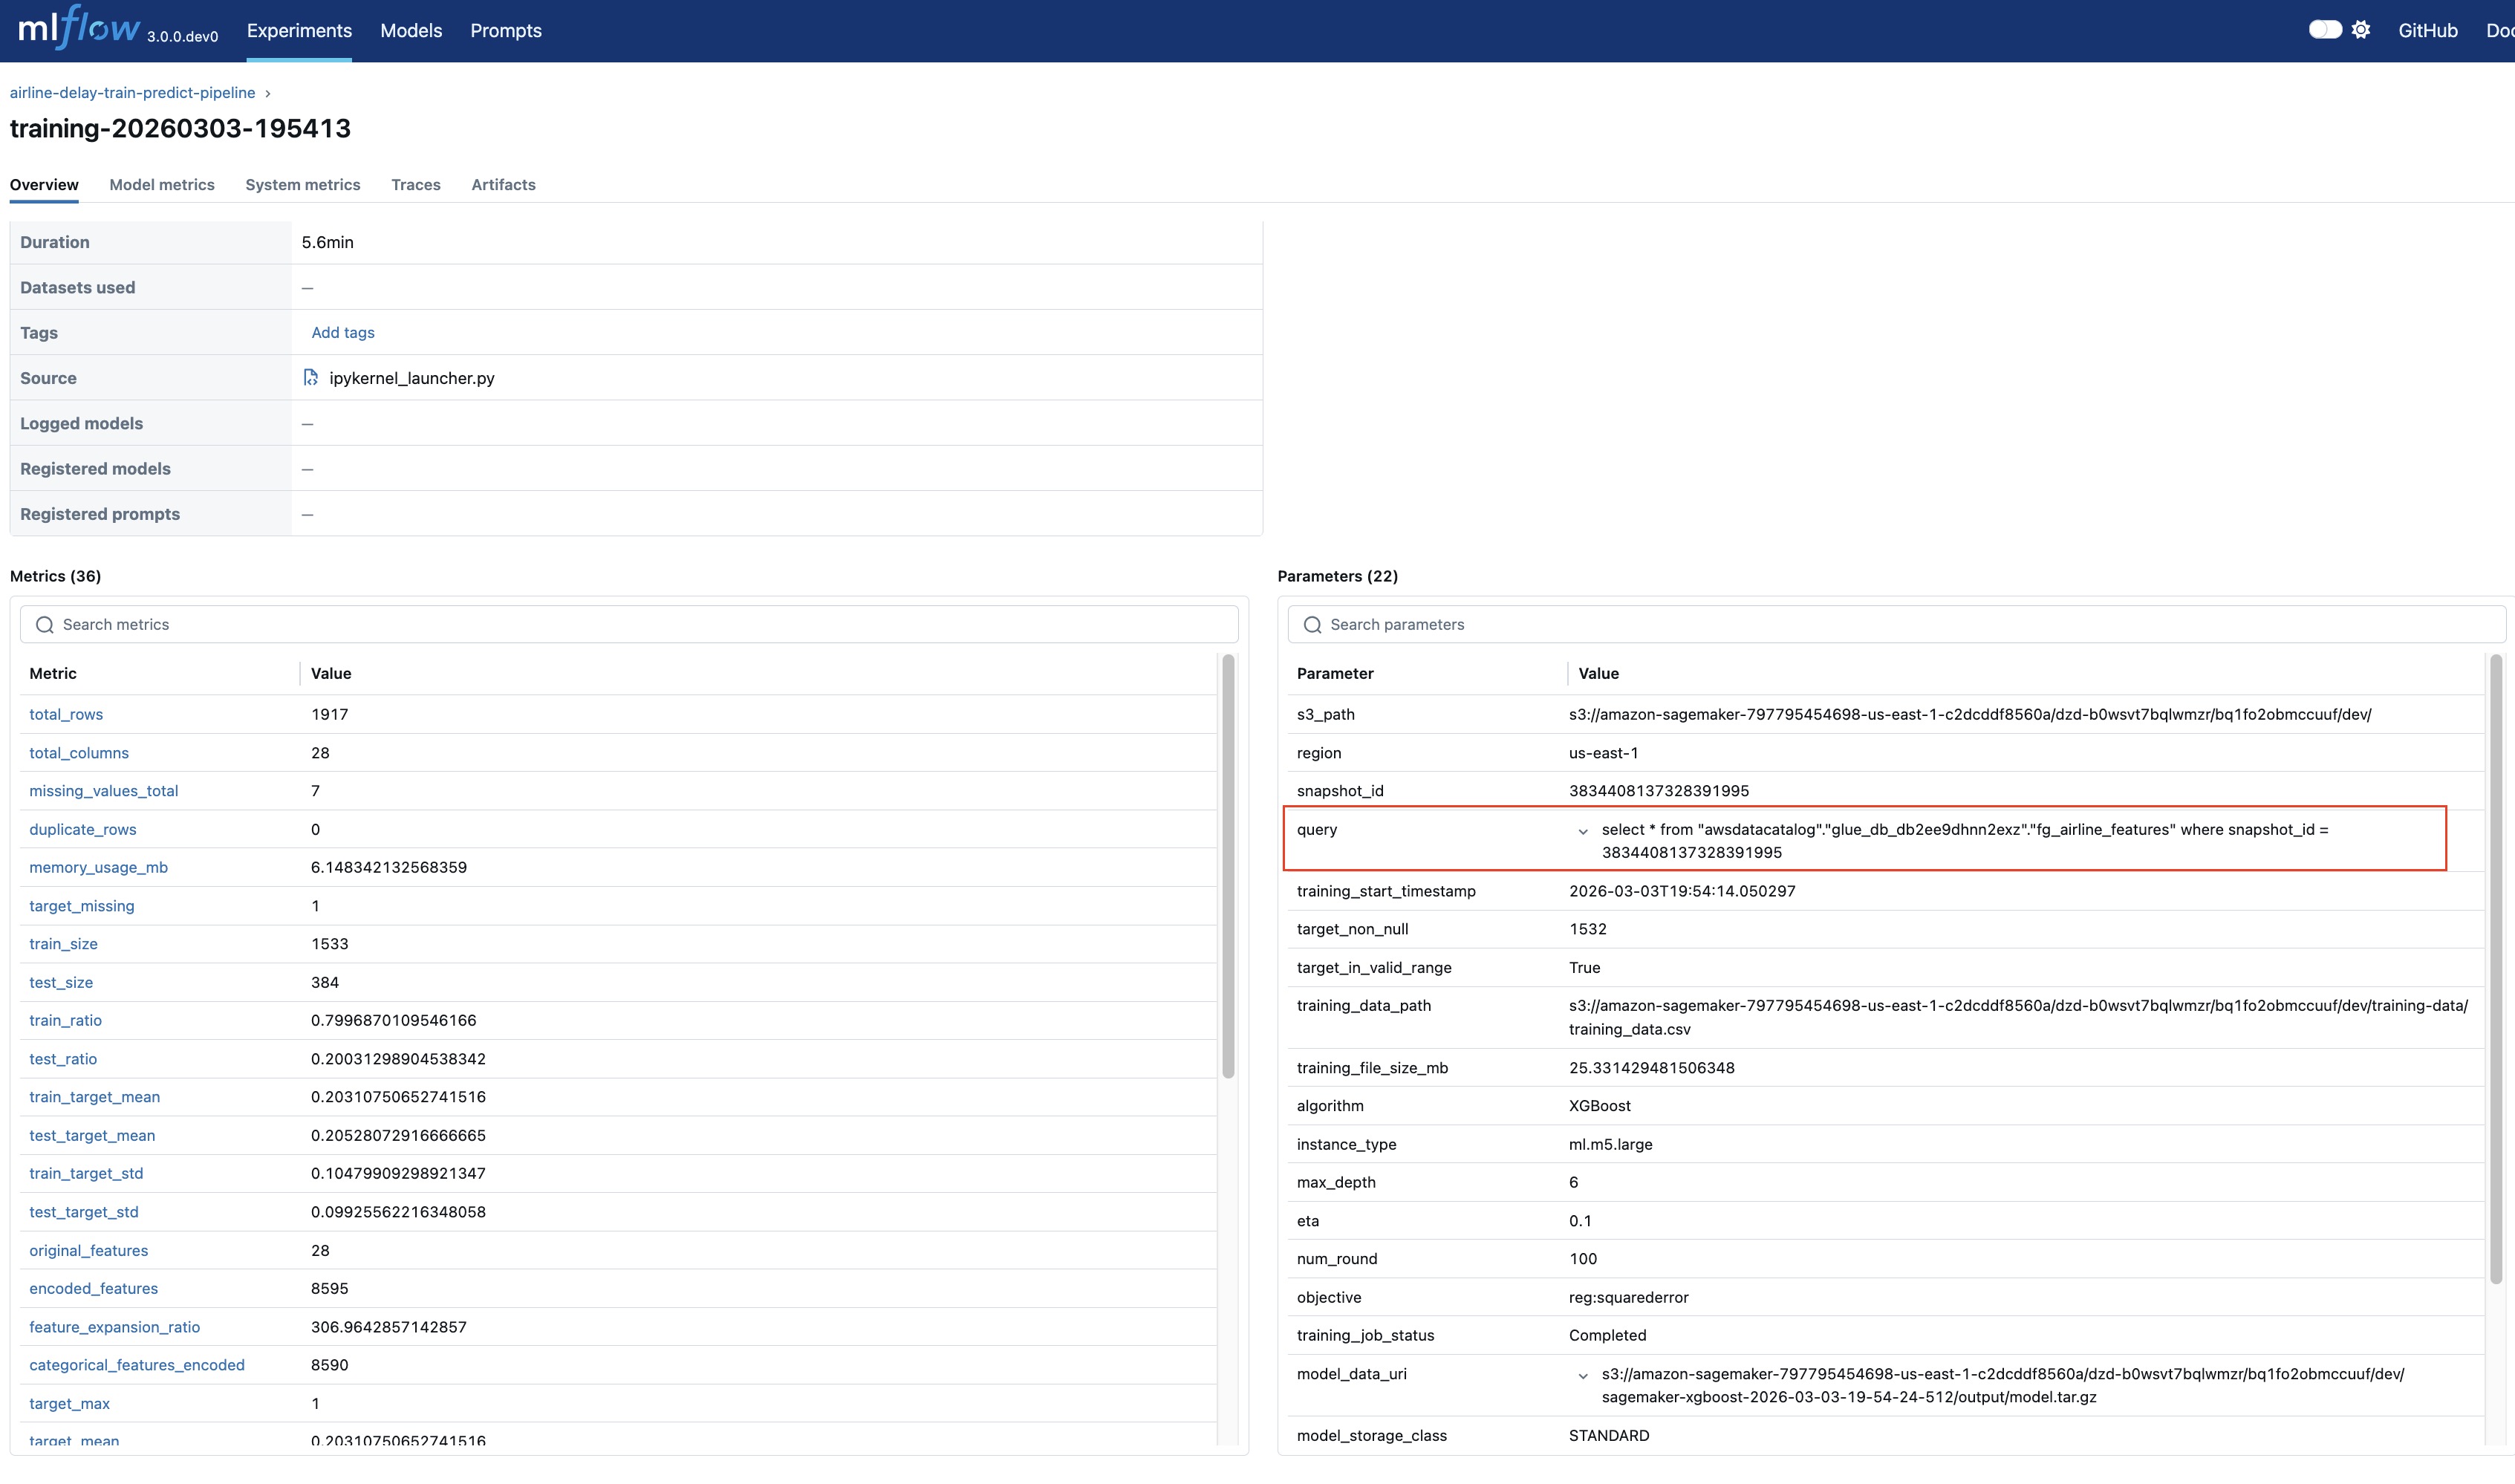
- train_model_with_comprehensive_metrics: This function persists the training dataframe to Amazon S3 and uses that dataset as input to SageMaker XGBoost estimator to train the airline delay prediction regression model. The training experiment parameters and the metrics S3 table snapshot ID and query are logged to the MLflow experiment for reproducibility as shown in the following figure.
- batch_transform: This process uses the test dataframe split as input to compute the airline delay predictions using the trained model. Input, output and performance metrics for this batch transform are logged in the MLflow experiment.
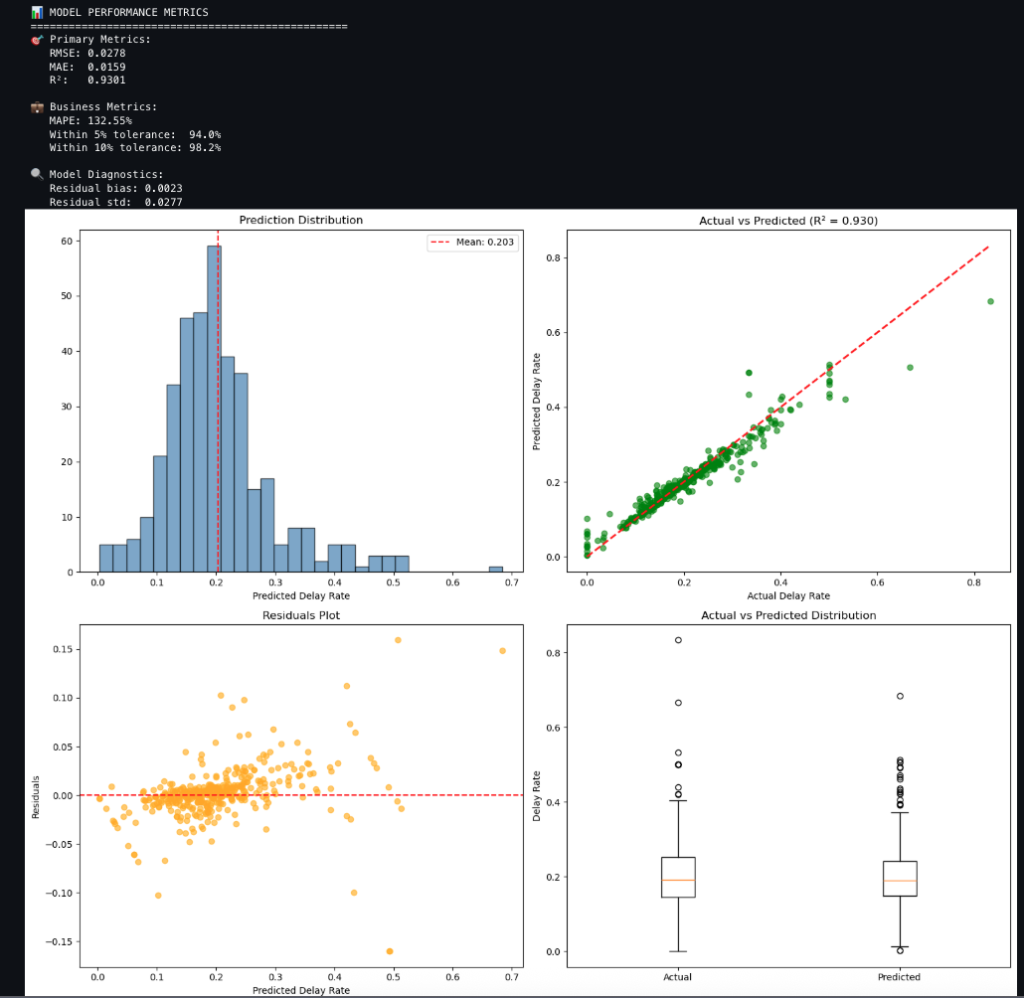
- analyze_predictions_with_evaluation: This function compares predictions to actuals and produces metrics and charts as shown in the following. The charts include:
-
- Prediction distribution of the delay rate
- Actual compared to predicted delay rate
- Residuals plot of predicted delay rate
- Actual compared to predicted distribution
Conclusion
Implementing an offline feature store with Amazon SageMaker Unified Studio and SageMaker Catalog provides a unified, secure, and scalable approach to managing ML features across teams and projects. The integrated architecture helps ensure consistent governance, lineage tracking, and reproducibility, while enabling seamless collaboration between data engineers and data scientists. By using Amazon S3 Tables with Apache Iceberg, organizations can use ACID compliance and time-travel capabilities, improving the reliability of training data and model performance. The publish–subscribe pattern simplifies asset sharing, reduces duplication, and accelerates model development life cycles.
To explore these capabilities in your AWS environment, set up your SageMaker Unified Studio Domain, publish your first feature dataset, and unlock the full potential of reusable, governed ML assets for your organization.
Acknowledgement
We sincerely appreciate the thoughtful technical blog review by Paul Hargis, whose insights and feedback were invaluable.
About the Authors
from Artificial Intelligence https://ift.tt/A8YzPlS